Quick Start
CONX-SFP Quick start quide
Default details
- IP Address setting
- DHCP enabled
- Static IP address 192.168.0.232/24 if DHCP times out (under development)
- MAC Address
- Wetatronics range 04-58-5D-00-00-00 to 04-58-5D-0F-FF-FF (hex)
- Login for ssh and telent
- Usernane weta
- Password wetatronics
- Serial Ports
- Two serial ports enabled - software flow control
- Serial Port 1 - 9600 N81 no local echo
- Serial Port 2 - 9600 N81 no local echo
- CLI - Command Line Interface
- ssh enabled - TCP 22
- telnet enabled - TCP 23
Connectivity
Several options for connecting to the serial ports are supported
CLI
Login via ssh or telnet to the CLI and run
serial 1
To exit the session enter the break sequence
Ctrl+] Ctrl+]
To change the serial port BAUD
config serial 1 baud 115200
Change is applied immediately, optional save the changes to persist
system save
Telnet Direct
Telnet to the TCP port to connect directly to the serial port
- Serial 1 - TCP 3001
- Serial 2 - TCP 3002
telnet 192.168.0.232 3001
To exit use the local telnet client escape
Ctrl+] q
SSH Direct
SSH with a username and append the port [1|2] optionally append a BAUD rate
ssh weta:1:115200@192.168.0.232
To exit the session enter the break sequence
Ctrl+] Ctrl+]
SSH ControlMaster Limitation
The CONX-SFP supports one SSH channel per connection. SSH clients using ControlMaster (connection multiplexing) will experience (cosmetic) issues when attempting to open additional sessions.
What is ControlMaster?
ControlMaster is an OpenSSH feature that reuses an existing SSH connection for multiple sessions, reducing connection overhead. Oftern set in ~/.ssh/config.
Symptoms:
- First SSH connection works normally
- Second SSH session from same client will see warning messages such as:
mux_client_request_session: session request failed: Session open refused by peerControlSocket /tmp/sshcontrol-xxxx already exists, disabling multiplexing
Workarounds:
-
Disable ControlMaster for CONX-SFP - Add to
~/.ssh/config:Host 192.168.0.232 ControlMaster no -
Override on command line:
ssh -o ControlMaster=no weta@192.168.0.232 -
Close master connection before reconnecting:
ssh -O exit weta@192.168.0.232
ssh weta@192.168.0.232
CLI access via the serial port
Connect a standard Cisco style serial console cable with a roll-over adaptor (flips 1-8 to 8-1)
Use a terminal emulator such as Minicom to connect at 9600 N81 by default - the terminal emulator speed must match the port speed for the break sequence to be detected
Send a serial Break Sequence - Minicom example Ctrl+A F
This provides CONX-SFP CLI access to set a static IP address or update firmware
** Hardware Break - CLI Active ***
Type 'help' for commands, 'exit' to quit
serial-cli>
CLI set a static IP address
Current configuration can be shown
serial-cli> show network
Network Status:
  Current Runtime Configuration:
    IP Address: 0.0.0.0
    Netmask: 0.0.0.0
    Gateway: 0.0.0.0

  Configured (Saved) Settings:
    DHCP Enabled: Yes
    IP Address: 192.168.0.232
    Hostname: Wetatronics_0036
    SSH Port: 22
    Primary DNS: 8.8.8.8
    Secondary DNS: 1.1.1.1
Use the config network command to apply changes
serial-cli> config network
Usage: config network <subcommand>
  dhcp [on|off]                    - Configure DHCP
  static <ip> <mask> <gw>          - Set static IP
  hostname <name>                  - Set hostname
  ssh-port <port>                  - Set SSH port
  dns <primary> [secondary]        - Set DNS servers
  dns                              - Show DNS servers
Example disabling DHCP and sending static ip address
serial-cli> config network dhcp off
DHCP disabled
serial-cli> config network static 192.168.0.10 255.255.255.0 192.168.0.254
Static IP configuration set:
  IP:      192.168.0.10
  Netmask: 255.255.255.0
  Gateway: 192.168.0.254
  DHCP:    disabled
Note: Save configuration with 'system save' and reboot to apply
Save the changes and restart the SFP to apply the changes
serial-cli> system save

Saving configuration to flash...
Configuration saved to flash successfully
serial-cli> system restart
Pinout
The RJ45 connector provides either:
- One RS-232 serial port with hardware flow control or
- Two RS-232 serial ports without hardware flow control
The Pinout is designed so a straight through Ethernet cable can be used to connect to network device console ports using the Cisco style standard pinout
This works with Cisco, Juniper, Palo Alto, Arista, Mikrotik and many more
A Y splitter cable can be used breaking out the single RJ45 into two RJ45 sockets for two serial ports
Looking at the end of the SFP mounted with thw label up in a device
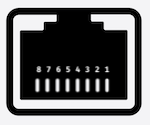
| Pin | Function |
|---|---|
| 1 | RX2 / CTS - Receive Data Serial 2 or CTS for Serial 1 |
| 2 | Spare - Future feature |
| 3 | RX1 - Receive Data Serial 1 |
| 4 | GND - Ground |
| 5 | GND - Ground |
| 6 | TX1 - Transmit Data Serial 1 |
| 7 | PWR - Power for Future feature |
| 8 | TX2 / RTS - Transit Data Serial 2 or RTS for Serial 1 |
Network Device support
The CONX-SFP emulates a 1000BASE-LX SFP to the Network device
Currently speed negotiation needs to be disabled, we are working on options so this won’t be required in future
Juniper
Disable negotiation and set the interface speed to 1G
ge-0/1/0 {
    description "Wetatronics CONX-SFP console server";
    speed 1g;
    ether-options {
        no-auto-negotiation;
    }
    unit 0 {
        family ethernet-switching {
            interface-mode access;
            vlan {
                members management;
            }
        }
    }
}
Cisco IOS
Disable speed negotiation on the interface
interface GigabitEthernet1/0/49
 description Wetatronics CONX-SFP console server
 switchport access vlan 10
 switchport mode access
 speed nonegotiate
 spanning-tree portfast
Mikrotik RouterOS
Disable speed negotiation on the interface
/interface ethernet
set [ find default-name=sfp4 ] auto-negotiation=no